SR3 RSX Front diffuser repair attempt #2
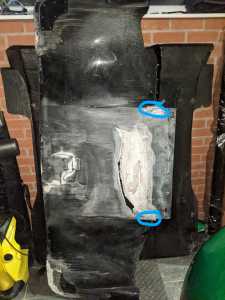
As you can see, my front wing is a mess. I'm going to lay out my project plan and would like to know based on your collective shared experience and far superior knowledge, if there's anything else I should be doing to ensure it doesn't get damaged again immediately when I hit the track next year.
Diagnosis
I'm still unclear as to how the damage was caused in the first place.
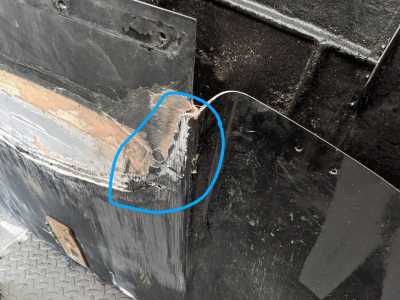
I think the front ride height had been set too low, which was giving me horrible porpoising and making the front bodywork vibrate harshly at 180kph+. I think this is what caused the cracks to appear either side of the central 'plane', which then allowed the underside to scrape completely along the ground under load, which then did subsequent damage making the giant hole in the centre and completely stripping back the areas around the side skid plates and splitter edge.
Therefore i'm hoping the repairs I intend to do will prevent these tears in the structure and therefore fix the problem - but without understanding where the pressure points are on this piece of bodywork when under high downforce load, it's difficult to know for sure.
Refurb plan
- Central plane fix
My plan is:
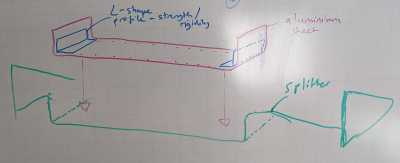
On the interior side, use 0.5mm aluminium sheet, and bond + rivet it to the inside of the central plane. (Ignore the blue L-shaped idea, I was going to add these as even more bracing, but I think this is overkill and shouldn't be needed). On the exterior side, add new layers of fibreglass, bodyfill over it all, and sand to a smooth finish before prime/paint.
- edge repairs
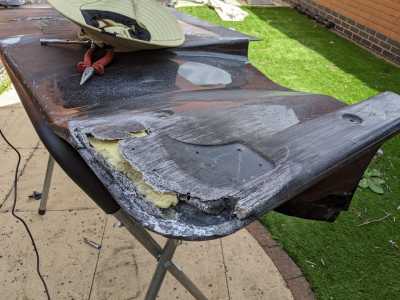
I've used some expanding foam already to fill in these hollow areas. That'll give it some structure so I can then apply multiple layers of new fibre all over. Then carefully sand away until it's restored to the original shape. Finally bodyfiller, sand, prime, paint.
- tow ring attachment area
You can probably make out from the above pic if you look carefully around the centre, that this whole area is also cracked around where the centre skidplate is, as this would have been scraping on the ground and forcing this area up causing the cracks. I've filled the inside with expanding foam to help support it as much as possible, and again, i'll be following the same process; new fibre layers + bodyfiller.
What do you guys think? Anything you'd do differently?
G'day @rojid
I'm no fibreglass/composite expert so I'll leave it to others to comment on your repair plans. There does seem to be a fair bit of work involved.. have you considered buying a new splitter?
Focusing on the reason for the damage in the first instance, I'm wondering if you could share your set-up sheet (or just the key settings). As a starting point I'd be asking what your spring rates are (front and rear) as well as your static ride heights (measured under the wear pads (assuming they were actually installed - they look like they are missing in the pics... maybe worn/torn off?)
The other question I would have that might help diagnose the issue(s) is whether you think the damage to the centre section (large area of wear), is caused by the same issue as the damage to the corner of the splitter. The reason for asking this is because, as you mention, it looks like your ride height (and/or spring rates) are too low and that's causing the central wear during heavy braking... while the damage to the corner of the splitter looks to me like you've been attacking the curbs way too much. If that's the case there are two separate problems to fix. I might be wrong, so would be interested if you think the corner damage is done under heavy braking as well....
A friend of mine bought an older SR3 with a retrofitted 'high downforce package' and immediately struck a very similar issue. Ultimately we increased his spring rates by ~50% (to the same levels as suggested by Radical Factory for the RSX) and fully rebuilt the support stays for the slitter (made it similar to my RSX) and the problems were immediately resolved....
Having answers to some of the above questions might help myself and others give some more suggestions to help....
Rod
Posted by: @rojidI'm still unclear as to how the damage was caused in the first place.
I ruined a front diffuser in a couple of laps last month, very similar to yours from the looks of it. The cause was from all of the rivets that secure the tow hook to the crash box had sheered off, and that allowed the diffuser to drop down and drag on the track surface. This is not something that I kept and eye on, however I should have as part of basic nut and bolt check. I don't know why the rivets failed, but probably started from a flat tow in or perhaps contact a few rivets failed/weakened, and then months later that last rivet failed.
If your tow hook is not fastened securely to the crash box, then reinstall the failed rivets and add a couple additional.
Posted by: @rjbenderG'day @rojid
I'm no fibreglass/composite expert so I'll leave it to others to comment on your repair plans. There does seem to be a fair bit of work involved.. have you considered buying a new splitter?
I have. It's £1300 incl. VAT so it's worth me having a go refurbing it for nothing first.
Posted by: @rjbenderFocusing on the reason for the damage in the first instance, I'm wondering if you could share your set-up sheet (or just the key settings). As a starting point I'd be asking what your spring rates are (front and rear) as well as your static ride heights (measured under the wear pads (assuming they were actually installed - they look like they are missing in the pics... maybe worn/torn off?)
So i haven't been particularly disciplined with maintaining an accurate record of the initial setup the team did for me prior to my very first outing in the car. What I do know is the team weren't sure which springs were on the front. They think it's a '100' (i assume that's lb ft?) and 110 rear.
In the last outing after my initial fix to the splitter failed after about 5 laps, I resorted to measuring tape and raised the front ride height in the pits, to prevent any further wear. This did seem to reduce the scraping somewhat as the marshals said they couldn't hear it anywhere near as loudly anymore, but then again by this point the state of the front splitter was as per the pic above!
Posted by: @rjbenderThe other question I would have that might help diagnose the issue(s) is whether you think the damage to the centre section (large area of wear), is caused by the same issue as the damage to the corner of the splitter. The reason for asking this is because, as you mention, it looks like your ride height (and/or spring rates) are too low and that's causing the central wear during heavy braking... while the damage to the corner of the splitter looks to me like you've been attacking the curbs way too much. If that's the case there are two separate problems to fix. I might be wrong, so would be interested if you think the corner damage is done under heavy braking as well....
I'm pretty sure it's related - the damage was caused at the same time. If I think back to 2022, I did 2 track days at Donington, 2 at Oulton park. No issues with vibration or scraping etc. The car then went in for some work with the team and I think they flat-patched it again and setup, but i didn't ask for any setup sheet. I then did a mini test day at Silverstone in November and that's when I experienced this massive bodywork vibration for the first time at high speed, and I recall posting about it on the facebook group.
That continued through the 3 outings I had in 2023. Listening to the onboards, the scraping increases under initial braking from high speed. Haven't had any major hits with any kerbing either, for sure.
Posted by: @rjbenderA friend of mine bought an older SR3 with a retrofitted 'high downforce package' and immediately struck a very similar issue. Ultimately we increased his spring rates by ~50% (to the same levels as suggested by Radical Factory for the RSX) and fully rebuilt the support stays for the slitter (made it similar to my RSX) and the problems were immediately resolved....
Having answers to some of the above questions might help myself and others give some more suggestions to help....
Rod
this sounds like a good plan to me - replace with some new stiffer springs (where I'll then known what rates they are!) as per factory setting and put in a pair of fresh support stays. Thanks!
As you have said... you should have been given a 'set-up sheet' after your car was adjusted on the flat patch. I would ask whoever did it as I'm almost 100% sure they will keep records.
Not knowing the exact ride-heights that you started with is going to make this a little harder... it may simply be it was too low... although I doubt that.
As a starting point it seems like you might have 100 N/mm springs in the front and 100N/mm in the rear. I have used 110N/mm in the front and 100N/mm in the rear since purchasing my car and this was the set-up recommended as a starting point for my RSX.
So as a starting point I would suggest switching your front and rear spring sets.... (although I doubt this is the problem as I know plenty of other cars use 100N/m in the front)
(Note that "lb ft" isn't a measure of spring rate - the springs you have that are "100" are not pounds per inch either.. 100N/mm is equivalent to 570 pounds per inch....)
I suspect after reading your reply that you may not have enough 'pre-load' wound into your front shocks. That would give the exact symptoms you have described...
If the 'team' who did your set-up are familiar with Radicals, they should be aware of the need to put 3-4 turns of pre-load into the front springs by adjusting the spring perch prior to being installed in the car. Maybe they didn't check that when doing the set-up? (would require the shock being 'un-loaded' or taken from the car and checked.)
So when changing your springs around as suggested above, make sure you put 4 turns of pre-load into the front shocks... at least then that will give you the correct starting point as per factory set-up suggestions...
Read this string of posts... it has more detail

