How many use custom seat inserts and where do you have them made?
Sitting in my recently purchased SR3 I feel low compared to looking over the dash. I'm 5'9", so not terribly short. The stock seat and cushion in the car feels like pretty much nothing to me compared to a race seat in a street car.
I visited a Radical dealer recently and noticed almost every car had a custom insert in the seat. I was told they cost around $3k, a bit shocking.
What is everyone else doing? Is a seat insert the norm or do most drive without? How are you having them made without breaking the bank?
Hi Mark, You want to sit low as you reasonably can with these cars. I am 6' tall, but much of my height is in my upper body and I struggle to be low enough in the car. If you are too high you will get a lot of helmet buffeting. The proper seating position should be low in these cars and it take a bit to get used to it. I would bring some foam pads with you when you take the car out to the track and use that to try different heights. You want to be as low as possible and still have enough visibility to see the track.
Once you have experimented with different seat heights you will have enough information to know if you need to pour a seat or not.
Charley
Gobble, you might be interested in this once you figure out where you want to be in the car.
https://www.pegasusautoracing.com/productselection.asp?Product=4525
I've heard the first one you do is a little tricky though. Luckily I fit pretty well in the standard seat, now if I lost the 25-30lbs I should....... maybe not so much.
Pegasus is in New Berlin Wisconsin. There's also a place that does really nice custom seat inserts in Delafield WI but they are in that $3k range.
I've made custom seat inserts from kits you can buy online. You can find videos about how to do it. Once I was happy with mine, I sent it to a local automotive interior shop and had them cover the insert with 4mm automotive foam and then the fire-resistant material that comes in the kit.
I'll be making another one this spring for my "new to me" car.
Here's the video I used as a guide:
Cool I'll have to check out those kits. I've been to Pegasus many, many times and will be a good resource now that I have a real track car.
A custom seat is pretty much a necessity. I plan to use the BSCI kit. I figure even if I have to do it twice it’s still a significant savings over having someone else do it.
In a pinch you can get memory foam sheets that will give you a very snug and supportive fit. I experimented with a few different densities and found a couple that work well. It is a good temp solution.
I've been doing a bunch of reading and it sounds like the bead seat kit is the way to go. I might give that a try.
Take lots of pictures, I am looking forward to seeing the process. Out of curiosity why are you going the bead seat rout over the BSCI? I don't have any first hand knowledge of which is better. I know they are both popular, I watched a bunch of videos when I was considering adding a seat and I was leaning toward the BSCI kit. But then I sat in the seat and looked closely and found that there wasn't much excess room to fill up 🙂
I talked to one of the tech guys at Pegasus and he told me the bead option is better and easier than the BSCI expanding foam option. In watching different videos it looks like the beads give you more working time and don't have the issue of expanding in areas where you don't want it. I also spent time looking at other racer forums and they seem to mostly prefer beads over the other option.
You're right, there isn't much space to fill. The guy from bss recommended the small size kit for the Radical and also told me they rent a vacuum pump and hot knife for $25.
Here is my second go at a bead seat. The first try I used the BSS small kit according to their recommendation. That kit would have been fine if you were just looking to only create back support but looking at the cars at places like Team Stradale they build seats with bolsters. I screwed up the first try by sitting too upright while getting fitted.
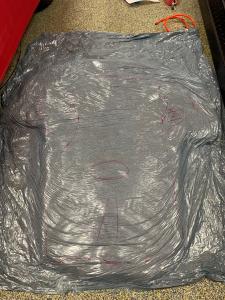
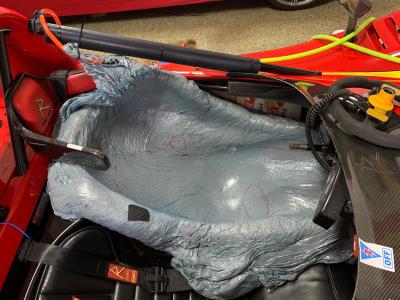
This is the medium kit on the floor waiting to go in and after curing in the seat for a couple hours. It took a good hour of working the beads while sitting in the car to get it right. Also, if you have your wife help have her be careful with her nails. She punctured the bag and I had to patch with a piece of racer's tape.
Once it fully cures I need to cut the excess with a hot knife then cover with Nomex fabric.
I think it turned out pretty good this time. It looks pretty big in the picture but I'm only 165 pounds.
That is coming out really well!
A warning to anyone trying this. Stick with the small kit and don't try to do the side bolsters. The bead kit cures very rigid and is near impossible to get out without busting it up. I'm having to trim mine down and do away with the bolsters. This has been a very frustrating process.
I'll finish my bead seat story here. My first attempt was a failure. I first bought the small size kit and sat too upright in the car when it was being fitted. I was comfortable, but was in the wrong position. When it cured my feet couldn't reach the pedals
This was my first attempt. Too many wrinkles in the bag and probably too small of a kit size.
My second attempt was the medium kit. I tried to make large shoulder bolsters like the cars at Stradale had. I think we did a nice job of making them, but the beads cure hard and the seat wouldn't come out! Overall this looked much nicer than the first attempt however. This is first laid out on the floor then cured in the car
Here is what happened when I tried to remove it. I thought it was going straight in the trash.
I was able to salvage it though and kept enough shoulder bolster to pretty much match what the cars had at Stradale. I added some fiberglass reinforcement on the back of the bolsters to keep them solid. Here is my finished, covered, seat and a picture I took of a seat at Stradale last week.
When you're sitting in the seat and the beads are being molded, it's a lot more comfortable then when the beads cure. The bolsters became too restrictive when cured and I had to shave some of the material off. Be careful not to make the seat too tight because it won't budge once it cures.
Thanks for sharing this. So is it possible to remove the seat before it becomes too stiff and without ruining the shape?
I was told by the guy from BSS not to do that.
Two problems with removal after curing:
1. I didn't do a good enough job of blocking off the area left of the driver. Beads got stuck in there and couldn't lift out because of the ledge near the top.
2. The seat where your hips are is wider at the bottom than the top. That makes it more difficult to remove once cured. It's not easy to even get it in-n-out now. I have to lift, slide forward, lift one side, slide forward, etc. but it comes out.


