
Baseline setup Questions
Okay guys...I am going through my first time setup on my 2nd gen SR3. The car came on Dunlops and I deconstructed the setup on the car as it came to me. The car was really low, lacked much camber and the toe was pretty off.
I have a brand new set of Hankooks so I was following the factory manual for Hankooks.
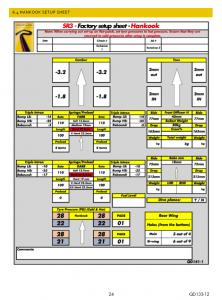
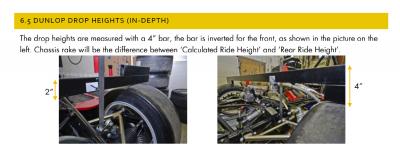
The manual calls for 163mm drop on the front which I measured from the bottom of my 4" bar with the car properly driver weighted. To get to this number I had to raise the car quite significantly. The sheet calls out for a front Diffuser height of 40mm. My question is with the car raised to 163mm it seems like the front diffuser is now too high? Where is the correct location to measure front diffuser height?
To add more confusion, why am I setting the ride height so high? The Handling Guide says to set the car as low as is allowed?
So do I set the car lower than the Hankook recipe or just follow the recipe? For now I am just daily tracking the car with the idea of running NASA next season which does not have height restrictions.
set it as low as you can without bottoming out the chassis. Then use tire temps to set the camber and toe. The recommended setting in the manual is a good place to start with.
I used small 1” strips of hard pink foam insulation attached with double sided tape to the underside of the splitter and side pods to see how low the car was getting on track.
in the UK, they have a 40mm board they slide under the car in impound, if it hits anywhere its a problem!
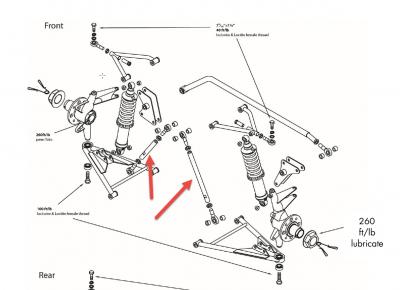
I am new to car setup as well. At my last race I noticed my front splitter is a lot higher than my competitors. This got me thinking about whether the suspension is setup correctly or there is something wrong with the front splitter mount. The rods are adjustable length, but correct me if I'm wrong, it doesn't look like they are meant to adjust the angle.
Looking at the Hankook setup sheet, how are these items defined and what are the measurement points? Ride? Drop? And isn't spring preload the method to change ride height? If so, why would it be separately specified?
@azwcat I am new to this also so take my comments for what they are.
The ride height is measure using a bar over the tires and measured to a fixed point on the chassis. This is described in the manual. I made my own bar from 1" x 2" aluminum square tubing.
The ride height is then adjusted by the front adjustable pushrod.
The rear ride height and subsequently the rake is then adjusted in the rear using spring compression.
Once rake is set you will then want to corner balance the car. And my interpretation is that you will then 'trade' rear ride height and rake to achieve proper corner balance.
Hopefully, someone will chime in if I have that completely wrong.
Posted by: @graemedset it as low as you can without bottoming out the chassis. Then use tire temps to set the camber and toe. The recommended setting in the manual is a good place to start with.
I used small 1” strips of hard pink foam insulation attached with double sided tape to the underside of the splitter and side pods to see how low the car was getting on track.in the UK, they have a 40mm board they slide under the car in impound, if it hits anywhere its a problem!
Thanks Graeme. So if I understand this correctly, I should set the front ride height as low as feasable and then take the rake setting of 18mm and adjust the rear? Then finish corner weighting the car? Sounds reasonable.
Yes,
I think Intrax have the ability to adjust shock length, so this is how I set the Penske dampers. This is the Radical procedure.
disconnect nick-link, substitute driver weight in seat (I used sand bags), lock steering straight.
set front damper spring preload.
set ride height front and rear. (Set the front as low as you want to using pushrods) adjust rear using spring perch, to get your rake. Double check the actual chassis ride height to the drop height until you know the relationship, then you can trust the drop height.
set camber & toe front and rear.
recheck ride height, front & rear
recheck camber & toe.
put car on scales,
Adjust rear spring perch only, to get an even load across the front two scales as close as you can. Cross weight is less important than a balanced front left to right.
to do this without effecting rear ride height, adjust one up and the other down the same amount. IE, 1 turn up on the left, 1turn down on the right. Or what ever amount is needed. Just stay balanced.
Reconnect the nick-links, adjust them to get a no load fit.
remove the ballast, unlock steering.
At the track,
us pyrometer to set the tire pressure as close as you can. The right pressure will be the center is an average of the inner and outer.
again, use the pyrometer to see if a camber adjustment is need to get the right spread. The inner should be 20-30 Deg F warmer than the outer. Now go back to the pressure and fine tune.
there have been books and books written about this, so there will be just as many different opinions. But this method worked for me. But I could have spent many more hours perfecting it. You just have to decide when it’s good enough.
@tommymills, thanks, I missed the page on car setup in the manual. Looking it over, I think you got the sequence correct. It is interesting that the front splitter height seems to be a byproduct of the other settings. So, if you do the proper setup and the splitter height is off from the target, does that mean there is something bent or misaligned in the rods that hold it on?
On my SR1, the splitter was fixed at the center mount in the crash structure. The side rods were adjustable, but that only twisted it to even it out side to side. But the front center would remain the same.
Posted by: @azwcat@tommymills, thanks, I missed the page on car setup in the manual. Looking it over, I think you got the sequence correct. It is interesting that the front splitter height seems to be a byproduct of the other settings. So, if you do the proper setup and the splitter height is off from the target, does that mean there is something bent or misaligned in the rods that hold it on?
@azwcat...after having just been through this entire process, I would have to agree with the method outlined by Graeme above. I had all the exact same steps as he mentioned, I just didn't know where I could deviate from the Hankook setup recipe outlined in the manual.
The Hankook setup recipe in the manual works and works well as I ran it last weekend. However, I could feel there was room for improvement, especially at my local track, over what was provided to us in the book.
The ride height off the splitter is 'mostly' a fixed reference unless your splitter rods are bent or not setup properly. The Radical Cup measures 40mm off any surface so if you are in a Spec series that is something to look out for. My local sanctioning bodies have no such requirement so the consensus recommendation seems to be to get the car as low as possible without compromising the car.
Posted by: @graemedYes,
I think Intrax have the ability to adjust shock length, so this is how I set the Penske dampers. This is the Radical procedure.
disconnect nick-link, substitute driver weight in seat (I used sand bags), lock steering straight.
set front damper spring preload.
set ride height front and rear. (Set the front as low as you want to using pushrods) adjust rear using spring perch, to get your rake. Double check the actual chassis ride height to the drop height until you know the relationship, then you can trust the drop height.
set camber & toe front and rear.
recheck ride height, front & rear
recheck camber & toe.
put car on scales,
Adjust rear spring perch only, to get an even load across the front two scales as close as you can. Cross weight is less important than a balanced front left to right.
to do this without effecting rear ride height, adjust one up and the other down the same amount. IE, 1 turn up on the left, 1turn down on the right. Or what ever amount is needed. Just stay balanced.
Reconnect the nick-links, adjust them to get a no load fit.
remove the ballast, unlock steering.
At the track,
us pyrometer to set the tire pressure as close as you can. The right pressure will be the center is an average of the inner and outer.
again, use the pyrometer to see if a camber adjustment is need to get the right spread. The inner should be 20-30 Deg F warmer than the outer. Now go back to the pressure and fine tune.
there have been books and books written about this, so there will be just as many different opinions. But this method worked for me. But I could have spent many more hours perfecting it. You just have to decide when it’s good enough.
Graeme...perfect! This is an excellent write-up. Thanks for taking the time to write this down. I am sure this will be referenced for years to come.
Posted by: @graemedOn my SR1, the splitter was fixed at the center mount in the crash structure. The side rods were adjustable, but that only twisted it to even it out side to side. But the front center would remain the same.
I have just replaced my front splitter and am looking at the rods and adjustment you have mentioned to get the alignment correct - does anyone know if there is an alignment method for these rods?
- Check height under centre which is fixed and then make these the same?
- Check height and then something else to the sides?
- Is there a front of splitter to rear of splitter height difference? This would change the angle front to back of the splitter
I don't know about cars other than SR3, but I assume many are similar.
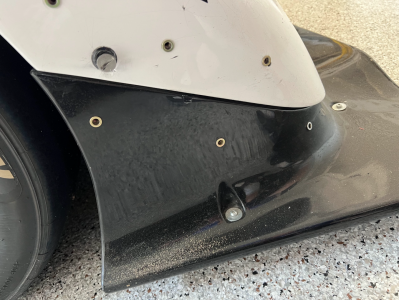
In my experience, I don't think that it is critical to get some exact height formula for the front spitter. The SR3 owner's manual setup section says the front should be 40mm from the ground. I use 45mm because I don't like to scrape and I also want a little extra height to pass tech inspection at Radical Cup race events. On the side adjustment which controls the height of the rear of the splitter, I adjust it to fit well with the nose bodywork. By fitting well, I mean that the interface between the nose and the front splitter bodywork has minimum gap and it should not require pulling on the nose to get the quarter turn fittings to engage. And that's it.
The factory setup has positive rake, which means that the rear end will be higher than the front. The lowest part of the car is naturally the front of the splitter. So the rear of the splitter will be higher than the front because of rake.
My splitter and nose looks like this. With the fastener loose, it aligns parallel and with little space between the nose and the splitter:


