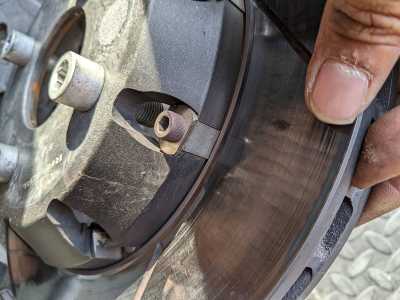
Replacing discs DIY?
i've never swapped out 2-piece rotors before...
i was going to rotate the fronts to the rear, as the rears have more surface cracks.
Then i was going to swap the front discs for some spare new ones i've already got. So i'll have new front discs, and ok-condition rears.
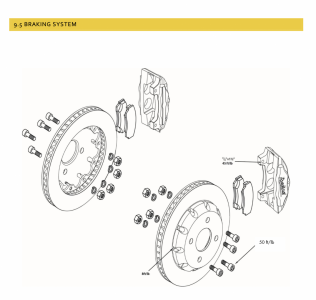
the procedure to remove the disc from the car looks fairly straightforward - remove caliper, remove bell housing and then.......remove the 10 bolts securing disc to housing?
what's the tightening torque value for those 10 bolts? and do i need to apply threadlock?
aaaany other handy tips to add?
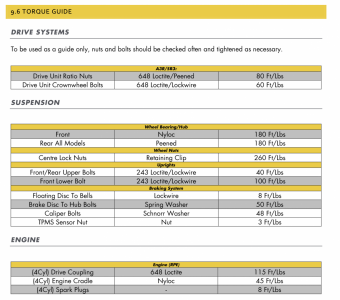
Hi @rojid, Here are the torque values from the owners manual. Radical recommends replacing the hardware every time you replace rotors. I know everyone does not necessarily follow this recommendation but that is what the factory recommends.
See David’s post below.
Yes, at least swap out the nuts (they have distorted threads that wear each time you tighten them). Howerver, I think Radical sells the whole kit with bolts and nuts. It's not that expensive, and worth doing.
Take your time and keep all the bits lined up so that when you're done the rotor rattles around on the bell.
@charleyhradicalsportscarregistry-com
Hi Charley. I am pretty sure this is a misprint. WISKO says that if you torque the hub bolts to 80 foot-pounds they will strip. In a following page on that manual I believe it says 50 ft-lbs for the brake disc to hub bolts in a table. In the SR3 XX manual, it looks to be corrected in both places:
I use 50 foot-pounds and I have never had one loosen on me.
sorry folks i was being blind...didn't notice the '8ft/lb' in the manual with the arrow pointing to the hole.. whoops.
@charleyH when you say "replace the hardware" are you just on about the bolts, i assume we don't have to replace the bell housing every time also?!
also given that the manual says "lockwire", so it looks like i'll have to tie the bolts together with wire - never done that before either,
found some howto vids and this document to help
https://www.wilwood.com/PDF/DataSheets/ds386.pdf
although....on the radical catalogue online i can't see the holes in the bolts to feed the lockwire through so...how are you supposed to do it?! maybe the pic isn't clear.
Hmm, another misprint? The factory does not safety-wire the hat to disc bolts at least on the newer cars because the bolts are fastened with a lock nut on the other side. If these were threaded into something fixed on the other side and the hat shape did not obstruct the safety wire, then it would make sense to safety wire these.
(Generally, If you want to safety wire a bolt, it needs a hole. There are drill jigs you can purchase for this, or you can purchase pre-drilled bolts at an aircraft supply shop.)
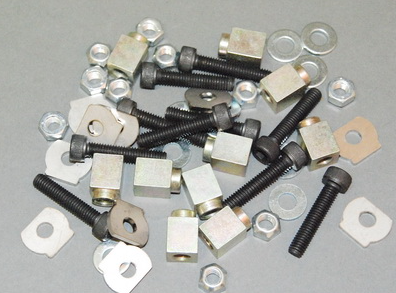
Yes, reuse the disc hats when replacing the worn discs. Radical has hardware kits like your picture above. It seems kind of a waste to replace the spacers and washers, but I could be mistaken ... perhaps since the discs float all of the hardware components take abuse and should be replaced. Better to be safe than sorry when it comes to brakes. The hardware kits are about $75 per corner. The nuts are special locking nuts. They are not nylon insert "nyloc" nuts.
@davidf @CharleyH
please could you advise on a brief step by step to remove the discs?
it looks like i need to remove the 2 bolts holding the caliper to the hub.
EDIT: can ignore the below sentence.... there's enough gap to put a 14mm socket on it, put a crowfoot adapter, then my smaller torque wrench attaches to that.
(There's not enough gap between the bottom caliper screw and the lower strut mount to get a 14mm socket head in there (not my 1/2dr ones anyway).
But presumably that is the first step:
1. remove caliper
2. remove the 4 hub bell bolts (3/8" hex bit)
3. remove the 10 hex bolts, swap the disc over.
Yes, you have it right. You may be able to get a wrench in there to hold the hub bolt nuts, but it is easier if you remove the uprights.
Posted by: @rojidThere's not enough gap between the bottom caliper screw and the lower strut mount to get a 14mm socket head in there (not my 1/2dr ones anyway).
I think I use a wrench here.
i successfully removed the discs today. Yes i know as radical maintenance goes its the most basic thing but hey its a step forward for me!
I didn't bother removing the uprights, in the end it was the 2 14mm caliper bolts, then there's a decent enough gap towards the bottom of the hub where you can get a socket wrench in to hold the wheel, and i used my impact to loosen the 3/8 hex bolt on the bell. They were rotating but seemed fairly tight to turn still, so switched to the socket end to loosen the nut, with the hex bolt remaining steady.
Not sure if it's supposed to be like that but the hex bolt seems almost mated to the bell now?
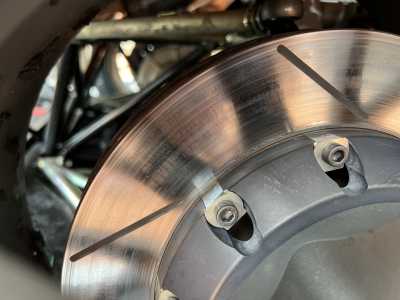
Anyway after that it's all plain sailing, cleaned the crud off the brake hardware and swapped the discs over. I didn't have any cracks going to the edge of the disc but there are cracks on the surface where my fingernail does catch on........not sure if that's an indicator of 'too big a crack' or 'normal surface crack'.
Just need to make sure i follow the bedding procedure in the manual now.
any advise on the bedding? The process in the manual seems pretty short...

